Back to section: Using the program

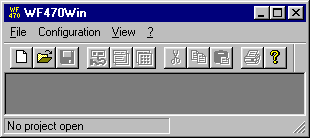
WF470WIN shows the basic menu as long as a project has not been opened, i.e. especially after calling-up the program without transferring a project path.
The basic menu comprises the menu items "File", "Configuration", "View" and "Help". When clicking on one of these menu items, an appropriate pull-down menu opens with additional entries. These are explained in the following sections.
|
|
The basic menu/file is opened if you are in the basic WF470WIN screen
To select one of the menu items in the pull-down menu, re-position the mouse to the required menu item and press the lefthand mouse key or use the appropriate direct selection key, without releasing the <Alt>key. |
You can also select the pull-down menu items "New project" and "Open project" directly from the WF470WIN basic screen using the key combination shown in the pull-down menu, e.g. <Ctrl>+N (press the control key at the same time as key "n" for the menu item "New project".
Select this menu item, if you wish to create a new project. The "New project" dialog box is opened. Additional information is provided under
Creating a new projectSelect this menu item if you wish to open an existing project. The "Open project" dialog box is opened. Additional information is provided under
Opening a projectSelect this menu item if you wish to set-up your printer to print the project documentation. The Windows "Printer set-up" standard dialog box is opened. Please refer to the Windows Manual or the Windows online help for information on this dialog box.
The 4 WF470WIN projects which were last opened, are listed in the example above:
1
WF470 project 4The project is directly opened by clicking on one of the listed projects with the mouse.
Select this menu item if you wish to exit WF470WIN.
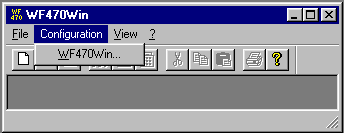
The Basic menu/Configuration is opened if, in the WF470WIN basic screen
To select the menu item WF470Win... in the pull-down menu, re-position the mouse pointer to the menu item and press the lefthand mouse key.
Select this menu item, if you wish to configure WF470WIN for your work.
Additional information is provided under
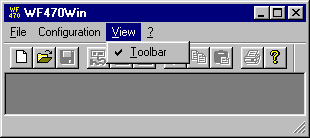
The Basic menu/ View is opened, if, in the WF470WIN basic screen
To select one of the menu items in the pull-down menu, re-position the mouse to the required menu item and press the lefthand mouse key or use the appropriate direct selection key, without releasing the <Alt> key.
Select this menu item, if you wish to display or suppress the toolbar. The check mark in front of the text menu item indicates that the toolbar is displayed.
Select this menu item if you wish to display or suppress the status bar. The checkmark in front of the text of the menu item indicates that the status bar is displayed.
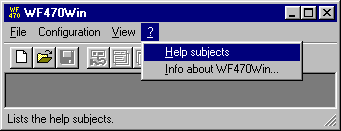
The Basic menu/File is opened, if, in the WF470WIN basic screen
To select a menu item in the pull-down menu, re-position the mouse to the required menu item and press the lefthand mouse key or use the appropriate direct selection key, without releasing the <Alt> key
Select this menu item if you wish to open online help.
WF470WIN then calls-up the browser which was selected in the configuration, and transfers the WF470WIN help file which can then be opened.
You can use the browser with the WF470WIN online help in parallel with WF470WIN.
Select this menu item if you require information about the version of your WF470WIN software.
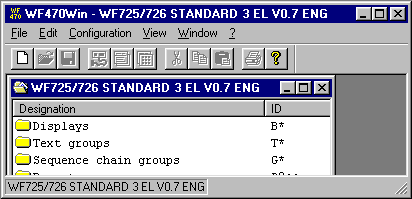
As already explained, the main menu is dependent on the presently active window. This is seen in WF470WIN, by the fact that although all of the menu items are available, they are either "disabled" (gray) or "enabled" (black) corresponding to the alternatives which are presently possible. The menu items with their associated functions are explained in the subsequent text, if they differ from those of the basic menu.
|
The main menu/file is opened if, in WF470WIN with the project open
Re-position the mouse pointer to the required menu item and press the left-hand mouse key to select a menu item in the pull-down menu; or use the appropriate direct selection key. Without releasing the <Alt> key. Further, you can select the pull-down menus "New", "Open", "Save" and "Print" using the key combination specified in the pull-down menu, e.g. <Ctrl>+N (press the control key at the same time as pressing the "n" key for the "New" menu item. |
Select this menu item, if a new object is to be created in the window which is presently active. WF470WIN then provides the appropriate dialog box(es), which can be used to select the properties of the new object. After they have been edited, the new object is entered in the list in the window.
Depending on the type of the window which is presently active, the object to be created can be a WF470 list (e.g. screen list) or an element within the list (e.g. V field).
Select this menu item if you wish to open an object. In order that this menu item is enabled, and you can open an object, you must have selected one beforehand in the appropriate window.
If the selected object is in turn, a container for an additional object, when opening, an additional window is opened with the list of the objects which are contained, e.g. after opening a text group, the text lists included in it are displayed.
If the selected object does not contain additional objects, the edit dialog associated with this object is opened, e.g. the parameterizing dialog for a message text.
You can also open an object, by positioning the mouse on the object and double-clicking.
Note:
An object, which is a container, can also have properties, e.g. ID and name of a list. When editing the properties of a container object, use the Main menu/File/Properties menu item.
Select this menu item, if you wish to close an object. In order that this menu item is enabled and you can close an object, an object must have been opend and also be active.
Only container objects can be closed using the Main menu/File/Close menu item, e.g. objects, whose contents are listed in a window. When an object is closed, the appropriate window is also closed on the screen.
Objects, which are not a container, display an edit dialog box when opened. These dialog boxes are closed using the "OK" or "Cancel" button of the dialog box.
It is alternatively possible to close the dialog box using the window control elements (refer to the
Basic menu).Select this menu item if you wish to save an object which has been changed. In order that this menu item is enabled and you can save an object, there must be an object which has been opened and changed.
You do not have to note whether and when an object must be saved (for instance, a list which has been changed).At the latest, when closing the objects you will be automatically prompted as to whether you wish to save the modified object.
Select this menu item if you wish to delete one or several object(s). First, select the object to be deleted.
Select this menu item, if you wish to edit the properties of an object. First, select the appropriate object.
Often, the "Properties" menu item has the same function as the "Open" menu item. For example, if the selected object is a V field of a screen. However, if the selected object is, for example, a text group, then when opening the object, the text list contents is opened, for dialog box properties to configure the group ID and the Group name.
Select this menu item, if you wish to open the list of contents of the lists on the board. For information, refer under
List of contents, WF470Select this menu item, if you wish to print the contents of one or several object(s) for your project documentation. First, select the objects to be printed.
If the printed object involves a container object, all of the objects contained in it are also printed.
For example, to print the complete project, in the project list of contents, select all entries and select the menu item Main menu/File/Print
.Select this menu item if you wish to program an Eprom card. The "Edit Eprom card" dialog box is selected. For more detailed information, refer under
Programming Eproms.Select this menu item if you wish to insert one or several WF470 lists into a load group directory. First, select the lists to be inserted in the group directory. The "Insert in the load group directory" dialog box is opened. Refer under
Administering the load- and Eprom group files.Select this menu item if you wish to insert one or several WF470 lists in an Eprom group directory. First, select the lists that you wish to insert in the group directory. The "List in Eprom group directory" dialog box is opened. For more detailed information, refer under
Administering the load- and Eprom group files.Select this menu item, if you wish to call-up the supplementary ZULIWIN program to converter from S5-assignment lists to WF470 step chain lists. You will find additional information directly under
ZULIWIN help.Select this menu item, if you wish to define the font types when printing your project documentation. A standard WINDOWS dialog box opens, in which you can select the font type and size. Only proportional fonts are offered.
Select this menu item if you wish to define the page format and margins when printing your project documentation. The appropriate standard WINDOWS dialog box is open.
Select this menu item if you wish to set-up your printer to print your project documentation. The appropriate standard WINDOWS dialog box is opened.
Select this menu item if you wish to load one or several WF470 lists on the board. First, select the lists to be loaded. For more detailed information refer under
Loading and reading WF470Select this menu item, if you wish to read one or several WF470 lists from the board. First select the lists to be read. For more information, refer under
Reading WF470Select this menu item if you wish to delete one or several WF470 lists on the board. First, select the lists to be deleted. For more detailed information refer under
Loading and reading WF470Select this menu item, if you wish to call-up the "operating keyboard" dialog box to send key codes via the PC keyboard to the WF470. For more information refer under
Operating keyboardSelect this menu item if you wish to exit WF470WIN.
Select this menu item if you wish to close the currently opened WF470WIN project.
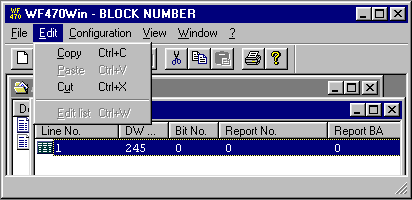
The Main menu/Edit is opened if, with a project opened, in WF470WIN
In order to select a menu item in the pull-down menu, position the mouse pointer again to the required menu item and press the lefthand mouse key or use the appropriate direct select key, without releasing the <Alt> key.
Further, you can select the pull-down menu items "Copy", "Paste", "Cut" and "Edit list" using the key combination specified in the pull-down menu, e.g. <Ctrl>+C (this means that the control key is pressed simultaneously with the "c" key for the "Copy" menu item.
The menu items of the pull-down menus, Main menu/Edit can only be used with objects, which are located within theWF470 lists, for example, text lists in a text group, individual message texts or display elements in the display list.
Select this menu item, if you wish to copy one or several objects into the Windows clipboard. First select the object to be copied. For more detailed information, refer to Main menu/Edit/Paste.
Select this menu item if you wish to insert (paste) one or several objects into an appropriate (container) object from the Windows clipboard.
Example:
Copying a message text1st step: Select the text to be copied

2nd step: Select the menu item, Main menu/Edit/Copy; this copies the message text into the Windows clipboard.
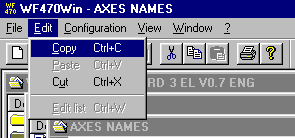
3rd step: If you wish to insert the text into another text list, then first open this and then activate the appropriate window.
4th step: Select the menu item, Main menu/Edit/Insert; this copies the message text into the opened text list from the Windows clipboard.
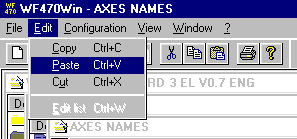
The text to be copied is inserted in the text list, taking into account the sorting sequence according to DW- and bit number:

Select this menu item if you wish to copy one or several objects into the Windows clipboard, and you simultaneously wish to remove from that object. First select the object to be copied. The objects which are cut, can be pasted at another location.
Select this menu item if you wish to combine message texts (link) with opened symbols, composite symbols or windows. More detailed information is provided under the Sections
Configuring symbols, Configuring composite symbols and Configuring message text windows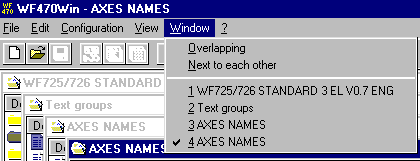
The Main menu/Window is opened, if with an opened project, you proceed as follows in WF470WIN
In order to select a menu item in the pull-down menu, re-position the mouse to the required menu item and press the lefthand mouse key or use the appropriate direct select key without releasing the <Alt> key
You can either display the opened windows overlapping or next to one another on the screen in the first section of the pull-down menu.
All of the windows opened in WF470WIN are listed in the second section. The appropriate window is activated and brought to the foreground by selecting an entry.
The toolbar below the WF470WIN main window header line contains a series of buttons, which allow you to reach the menu functions quickly and simply.
The function is displayed in plain text when you position the mouse to a toolbar button; you can select the function by pressing the lefthand mouse key.
In addition to the usual buttons for file and edit functions, WF470WIN offers the following special buttons:
|
|
Press this button, if you wish to switch to screen view while you are generating a display online on the WF470 (screen page 1). This button corresponds to function key F1 in the MSDOS configuring software. |
|
|
Press this button if you wish to changeover to the character set when generating a display online on the WF470 (screen page 2). This button corresponds to function key F2 in the MSDOS configuring software. |
|
|
Select this button if you wish to open the "Operating keyboard" dialog box in WF470WIN in order to control the board from the PC keyboard. |
To the next Section: Project administration