Back to Section: Menu functions
A WF470 project comprises all of the lists, which must be available so that the board can fulfill its process visualization task. The lists are saved in the form of binary files (i.e. they cannot be directly read using an Editor).
The lists associated with a project can only be saved on one or several floppy disks using the CP/M / MSDOS configuring software. However, in WF470WIN, you can use any directories on any memory media.
The lists associated with a project must always be located in one directory. It is not permissible to have several projects in one directory. Within a project directory, WF470WIN does not use any additional sub-directories. However, it is permissible (although not particularly practical), to manually set-up sub-directories for other purposes in a project directory.
For the project files, CP/M / MSDOS configuring software uses the ".SYS" extension. Further, WF470WIN permits, within Windows, the ".470" extension so that it is easier to make the necessary assignments. It is not possible to use the ".SYS" and ".470" extensions within any one project; WF470WIN is set to one of the two possibilities.
Existing project files can be transferred without any change and further processed. However, a change should always be made to ".470" extension, if, in the future, the projects are to be exclusively edited with WF470WIN.
| 0...n lists per project | ||
|
Bccc.SYS, Bccc.470 |
Process display lists |
c = 0x20...0x7F (*) |
|
Tccc.SYS, Tccc.470 |
Text groups |
c = 0x20...0x7F (*) |
|
P@xx.SYS, P@xx.470 |
Report lists |
xx = 00...31 |
|
Gccc.SYS, Gccc.470 |
Sequence chain lists |
c = 0x20...0x7F (*) |
|
Maximum one list per project: |
||
|
SDAT.470, SDAT.SYS |
System data list |
|
|
XTEX.470, XTEX.SYS |
Standard text list |
|
|
ASYM.470, ASYM.SYS |
User symbol table |
|
|
FSYM.470, FSYM.SYS |
Fixed symbol table (write-protected) |
Only for firmware <= V2.2 |
|
Help files for WF470WIN : |
||
|
LDATx.470, LDATx.SYS |
Load group list 1...3; |
x = 1...3 |
|
EPRMODx.470, EPRMODx.SYS |
Eprom group list 1...3; |
x = 1...3 |
|
Help files for CP/M / MSDOS configuring software: |
||
|
PINHV.SYS |
Project list of contents (when required, this can be generated using KA470) |
|
(*) with the exception of special characters, which are not permissible in file names.
One of the compromises made to keep the implementation costs of WF470WIN as low as possible, was to eliminate its own project administration. Thus, it is not possible to copy complete WF470 files within WF470WIN; however this can be realized using the resources of the operating system (e.g. Windows Explorer).
When copying WF470 files, observe the following:
WF470 files can only, and should only be deleted from WF470WIN. As a result of possible references, you should never delete files using operating system resources.
WF470 options are supplementary packages to the WF470 firmware which can be loaded. They are supplied independent of WF470WIN.
The WF470 options are copied for installation into the "WINWF470\470" directory, from where they are accessible for linking-into the project.
From there, you can directly copy into the project directories. This is then required, if, due to the compatibility with the module firmware, different option versions must be kept. Options, available in the project directory, have priority over those options in the global directory.
| CSKA.470, CSKA.SYS |
Option, sequence chain diagnostics |
Program code for WF470 |
|
CPRO.470, CPRO. SYS |
Option, reporting |
Program code for WF470 |
|
CSER.470, CSER. SYS |
Option, service modules |
Program code for WF470 |
|
CGR5.470, CGR5. SYS |
Option, Graph 5 |
Program code for WF470 |
|
CRKO.470, CRKO. SYS |
Option, computer link |
Program code for WF470 |
|
ERST.470, ERST.SYS |
Option, display generation (only for firmware <= V2.3) |
Program code for WF470 |
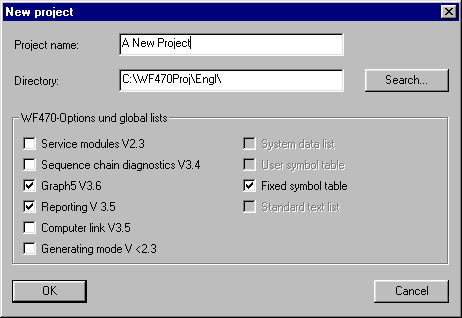
Select this from the basic menu File/New project. The following dialog box is displayed:
Proceed as follows:
When creating a project
Possible errors when creating a new project:
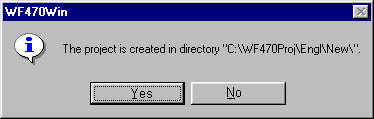
If you have accidentally selected a project directory, in which a WF470 project already exists, then you’ll receive the following error message:
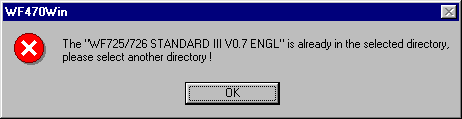
Acknowledge the error message, by clicking on the "OK" button, and correct your entries.
Note:
"Old projects" of CP/M / MSDOS configuring software, can be directly processed on the floppy disk, however it makes sense to copy the project files to the hard disk of your PC/PG. They can then be processed and used with WF470WIN. Proceed as follows:
Create a project directory
Create a new directory with a name which you can freely select, using operating system resources (e.g. WINDOWS Explorer):
Copy the WF470 lists from the floppy disk into the project directory
Using operating system resources (e.g. WINDOWS Explorer), copy all of the files (*.*) from the floppy disk into the newly created directory. If your project was saved on several floppy disks, then proceed as before with the other floppy disks.
When copying, observe that in future, instead of the ".SYS" extension, the WF470 files use the extension ".470". If required, re-name the files when copying, or also after copying. Additional information on the extension of WF470 files is provided under WF470WIN configuration.
Opening the project with WF470WIN
Opening the project with WF470WIN.
Notes:
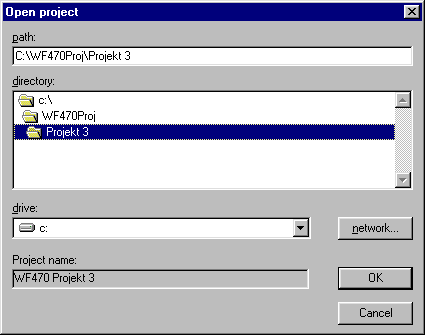
Select Open project from the basic menu. The following dialog box is displayed:
Proceed as follows:
Select the drive
If the project to be opened, is not in the default drive of WF470WIN, then you must first select the correct drive.
To do this, position the mouse pointer to the arrow at the righthand edge of the combo box "Drive" and press the lefthand mouse key. The combo box is then opened, and you can select one of the displayed drives by clicking on it.
If the project directory can only be addressed by the network and the network connection has still not been assigned a drive, this can be realized by clicking on the "Network" button. Refer to your WINDOWS Manual on how to set-up a network drive.
Select the project directory
If the project to be opened is not in the default directory of WF470WIN, then you must first select the path to the project directory.
Enter the complete path of the project directory in the "Path" input field and press the input key. The selected path is displayed using icons in the "Directory" list box.
By double-clicking on the directory icon, you can open or close the appropriate directories and therefore set the path, which is displayed in parallel in the "Path" input field.
In both cases, the name of the WF470 project is displayed in the "Project name" output field if a project is located in the directory which is presently selected.
Click on the "OK" button. The selected project is then opened and the List of contents, project, opened.
Notes:
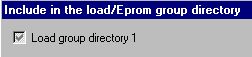
Using the load- and Eprom group directories, you can group WF470 lists for loading or programming an Eprom, which corresponds with the size of the memory card used on the board.
You’ll find basic information on load- and Eprom group directories in the Planning Guide for WF470, Sections 3.1.6 and 3.1.7.
You can include one or several lists in a group directory, if you select the lists in the appropriate list of contents...
...and you select the File/LADDAT or File/EPRMOD item from the main menu. The following dialog box is then opened:
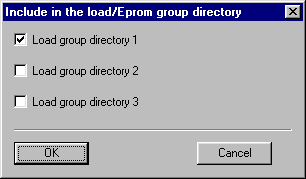
By clicking on the appropriate checkbox(s) you can select the group directory in which you wish to include the selected lists. Then acknowledge using the "OK" button.
If the checkmark of a checkbox is already set, then this means that the selected list is already included in this group directory. If you remove the checkmark (by clicking on the checkbox), then after acknowledgment, the list is removed from the group directory.
The checkmark can also have a third condition, gray:
|
|
For this condition, the following is always true: The thus marked group list is not changed after acknowledging the dialog box using the "OK" button.
The gray checkmark occurs for the following cases:
Group directories which are set-up, are listed in the project list of contents. If the group directory was not available at that time, then it is set-up with the first list to be entered.
By double-clicking on the entry of a group directory in the project list of contents...

...you can open the list of contents of the group directory:

Notes:
To delete entries in a group directory, first open the appropriate group directory and select in it, the entries to be deleted (refer to Including lists in a group directory).
Then select File/Delete from the main menu or press the "Del" key.
The selected entries are removed from the group directory if you respond to the following safety prompt with "OK".
Note:
You can delete a complete group directory by selecting this in the project list of contents and then selecting File/Delete from the main menu or pressing the "Del" key.
To the next Section: Configuring